Office Blog
Creating Consistent Slide Designs with Master Slides in PowerPoint
Creating a polished, cohesive presentation isn’t just about choosing the right fonts and colors for individual slides; it’s about establishing a unified design across every slide. This is where PowerPoint’s Master Slides feature comes in. Master Slides enable you to set a consistent layout, fonts, color schemes, and other elements throughout your presentation—saving you time and ensuring a professional look. Here’s how to use Master Slides to achieve a consistent design across your PowerPoint slides.
What Are Master Slides?
Master Slides allow you to create a standardized template that applies to all slides in a presentation. When you make changes to the Master Slide, these changes are automatically reflected across all associated slides, making it easy to update design elements consistently without editing each slide individually.
The Slide Master view includes:
- Slide Master – The top-most slide in the hierarchy, setting the main design for all slides.
- Layout Masters – Individual layouts that you can customize for specific slide types, like title slides, content slides, and more.
Steps to Create Consistent Slide Designs with Master Slides
1. Open Slide Master View
To begin creating your slide designs, open the Slide Master view:
- Go to View > Slide Master.
- This will open the Slide Master view, where you’ll see a hierarchy of slide layouts on the left.

2. Set the Overall Theme on the Master Slide
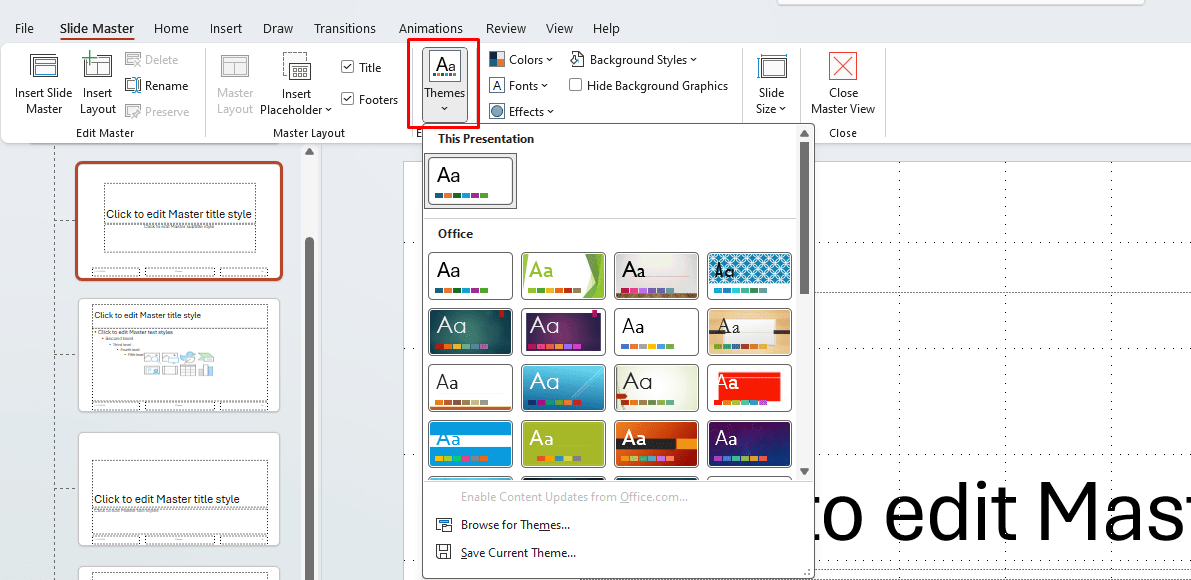
Start by applying or customizing a theme on the main Slide Master (the top slide in the Slide Master panel). This ensures that your font styles, colors, and other design elements are consistent across the presentation.
- To apply a theme: Go to Slide Master > Themes, then select from PowerPoint’s built-in themes or customize your own.
- Customize colors by going to Colors under the Themes tab, and modify fonts using the Fonts option.

3. Customize Layout Masters for Different Slide Types
Below the main Slide Master are individual Layout Masters, each tailored to a specific slide type, like title slides, content slides, and section headers. You can adjust each layout to better suit its purpose while still matching the overall design.
- Select a Layout Master (e.g., Title Slide) and adjust fonts, images, background, and placeholders as needed.
- If your presentation requires unique layouts, you can insert a new layout by selecting Insert Layout under Slide Master.
4. Add Placeholders to Control Content Placement
Placeholders are boxes that specify where text, images, or other content will go on each slide. By arranging placeholders in your Layout Masters, you control the positioning and alignment of content on all slides.
- In Slide Master view, select the Layout Master you want to edit.
- Use Insert Placeholder to add text, image, chart, or other placeholders. Arrange them to guide content layout on each slide.
5. Add Backgrounds and Design Elements
Add backgrounds, logos, or any recurring design elements to your Master Slides to ensure they’re consistently placed on every slide. For example, adding a logo to the Slide Master means it will automatically appear on every slide.
- To add a background, right-click on the Slide Master or Layout Master and select Format Background.
- For other design elements like logos, go to Insert > Pictures to add your image, and place it accordingly.
6. Set Consistent Fonts and Text Styles
Choosing and setting consistent fonts on the Slide Master ensures uniformity. Set font styles for titles, headings, and body text to avoid having to update them slide by slide.
- Go to Slide Master > Fonts to choose a cohesive font set.
- Customize text sizes, colors, and styles directly on each Layout Master. These changes will then apply across all slides using that layout.
7. Save Your Design as a Template for Future Use
Once you’ve perfected your Master Slide design, you can save it as a PowerPoint template (.potx file) for future presentations. This makes it easy to keep a consistent brand look or style across multiple projects.
- Go to File > Save As > Browse, then choose PowerPoint Template (*.potx).
- Name your template and save it in a location that’s easy to access when creating new presentations.
Get genuine Office Keys at affordable prices and enhance your productivity with premium Microsoft Office features—without breaking the bank!

