
Windows Blog
How do I Enable Hyper-V in Windows 11 Pro?
Hyper-V is a powerful virtualization tool built into Windows 11 Pro, enabling users to create and manage virtual machines (VMs) on their system. With Hyper-V, you can run multiple operating systems in isolated environments without needing third-party software. If you’re looking to enable Hyper-V on your Windows 11 Pro device, here’s a step-by-step guide to help you through the process.
Step 1: Verify System Requirements
Before enabling Hyper-V, ensure that your system meets the following requirements:
- Windows 11 Pro: Hyper-V is only available on Pro, Enterprise, and Education editions.
- 64-bit Processor with Second Level Address Translation (SLAT).
- CPU support for Virtualization: Ensure virtualization is supported and enabled in BIOS/UEFI.
- At least 4 GB of RAM.
To check if your system supports Hyper-V, you can open Task Manager (Ctrl + Shift + Esc), go to the Performance tab, and check the Virtualization status at the bottom right.
Step 2: Enable Virtualization in BIOS/UEFI
Virtualization technology must be enabled in your system’s BIOS/UEFI for Hyper-V to work.
- Restart your PC and press the key (often F2, F10, Del, or Esc) to enter the BIOS/UEFI settings.
- Look for Virtualization Technology, Intel VT-x, or AMD-V (depending on your processor), and ensure it is enabled.
- Save your changes and exit the BIOS/UEFI.
Step 3: Enable Hyper-V via Windows Features
Once virtualization is enabled in BIOS/UEFI, you can now activate Hyper-V within Windows 11 Pro.
- Press Windows + R to open the Run dialog.
- Type appwiz.cpl and press Enter to open the Programs and Features window.
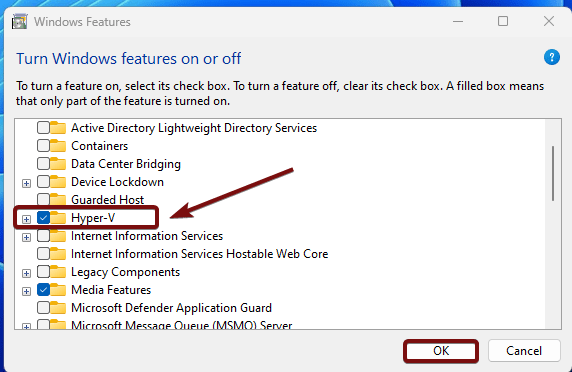
- In the left pane, click Turn Windows features on or off.
- In the list, check the box for Hyper-V.
- Expand the Hyper-V folder to ensure both Hyper-V Management Tools and Hyper-V Platform are selected.
- Click OK and wait for Windows to install the required components. Your computer may need to restart.
Step 4: Open Hyper-V Manager
Once your system has rebooted, you can access Hyper-V Manager to create and manage virtual machines.
- Press Windows + S to open Windows Search.
- Type Hyper-V Manager and click on the app from the search results.
- From Hyper-V Manager, you can now create new virtual machines, manage virtual hard drives, and configure network settings.
Step 5: Create Your First Virtual Machine
To create a virtual machine (VM), follow these steps:
- In Hyper-V Manager, select your computer’s name in the left-hand pane.
- Click Action from the top menu and select New > Virtual Machine.
- Follow the prompts in the New Virtual Machine Wizard to set up your VM’s name, location, memory, network configuration, and virtual hard disk.
- Once set up, you can install an operating system in the VM from an ISO file or physical media.
Step 6: Start and Manage Your Virtual Machines
After creating your VM, you can start and manage it through Hyper-V Manager.
- Right-click the virtual machine in the list and select Connect.
- In the virtual machine window, click Start to begin running the VM.
- From here, you can install the operating system of your choice, manage settings, and work within the virtual environment.
Get your cheap Windows 11 Pro Key today and unlock premium features for business and productivity at the best price!