
Windows Blog
Can I Revert to Windows 10 from Windows 11 Home?
If you’ve upgraded to Windows 11 Home but are considering reverting back to Windows 10, you’re not alone. Whether it’s due to compatibility issues, personal preference, or specific software requirements, reverting to Windows 10 from Windows 11 is possible under certain conditions. In this blog post, we’ll guide you through the process of downgrading and discuss key considerations.
1. Check Your Upgrade Timeline
If you’ve recently upgraded to Windows 11 Home, there’s a 10-day window during which you can revert back to Windows 10 without losing your files or apps. After this period, the process becomes more complicated, as you’ll need to perform a clean installation of Windows 10.
To check your upgrade timeline:
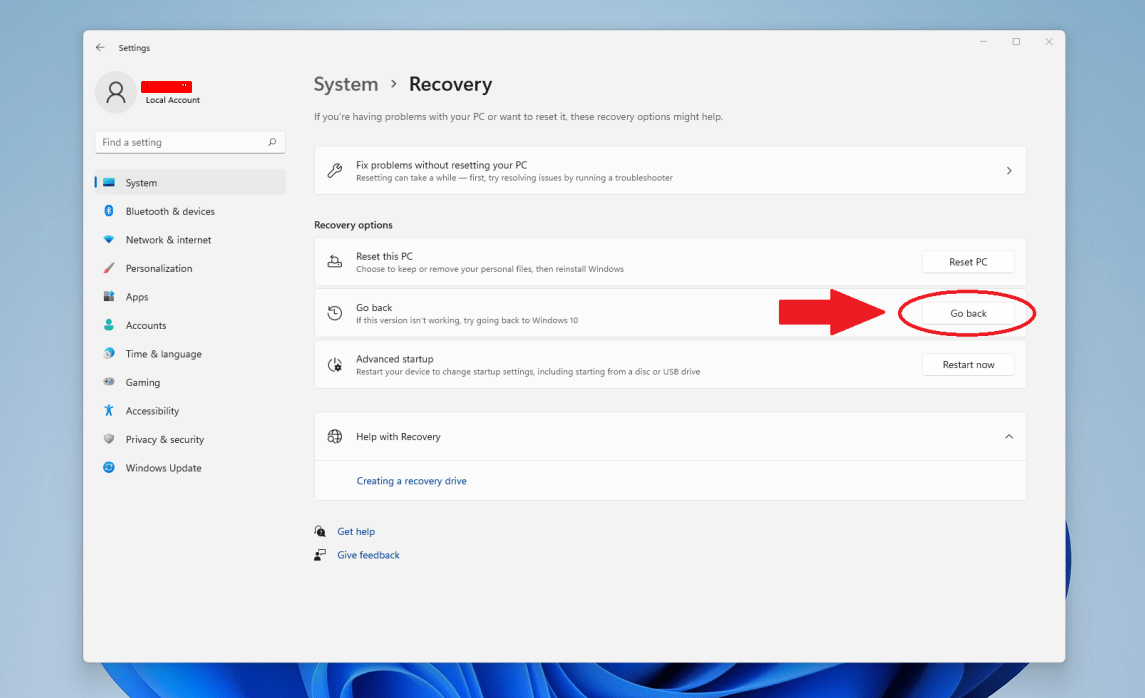
- Go to Settings > System > Recovery.
- Look for the Go Back option. If it’s available, you can proceed with the downgrade easily.
2. Prepare for a Clean Installation (If Beyond the 10-Day Window)
If more than 10 days have passed since the upgrade, you’ll need to perform a clean installation of Windows 10. This will require you to back up your files, as everything on your system drive will be erased. Additionally, you’ll need a valid Windows 10 product key and installation media.
3. Create a Backup of Your Files
Before downgrading, it’s crucial to back up important files. You can use external storage devices, cloud services like OneDrive, or Windows Backup tools. This step is especially important if you are performing a clean installation, as it will remove all your data and settings.
4. Download the Windows 10 Installation Media
To perform a clean installation, you’ll need to download the Windows 10 installation media:
- Visit the official Microsoft Download Center.
- Download the Windows 10 Media Creation Tool.
- Use the tool to create a bootable USB drive or DVD with Windows 10.
5. Begin the Installation Process
Once you have backed up your files and created the installation media, follow these steps:
- Insert the bootable USB or DVD into your PC and restart it.
- Enter your system’s BIOS or UEFI settings and set the USB/DVD as the primary boot device.
- Save changes and reboot. The Windows 10 installation should begin automatically.
6. Follow On-Screen Instructions
During the installation, follow the prompts to install Windows 10. When prompted, choose the partition where you want to install the OS (usually the C: drive) and confirm that you want to erase all content on that drive.
7. Reinstall Applications and Restore Files
After installation, you’ll need to reinstall all your applications. Once that’s done, you can restore your files from the backup you created earlier.
8. Re-activate Windows 10
Finally, make sure your Windows 10 is activated. If you’re reinstalling Windows 10 on a device that originally came with Windows 10, it should activate automatically. Otherwise, you’ll need to enter your product key during or after the installation process.
Get the best deals on cheap Windows keys and activate your system affordably!