
Windows Blog
How do I Back Up Files in Windows 10 Home?

Back up files are crucial for protecting your important data from unexpected loss due to hardware failures, accidental deletions, or malware attacks. Fortunately, Windows 10 Home provides several built-in tools to help you back up your files easily and effectively. Here’s a step-by-step guide on how to back up your files in Windows 10 Home.
Step 1: Open Settings
To get started with backing up your files, click on the Start menu (the Windows logo) at the bottom left of your screen, and select Settings (the gear icon). This will open the Settings window.
Step 2: Go to Update & Security
In the Settings window, click on Update & Security. This section contains various options for managing updates and recovery, including backup settings.
Step 3: Select Backup
In the Update & Security section, click on Backup from the menu on the left. Here, you will find options for backing up your files and settings.
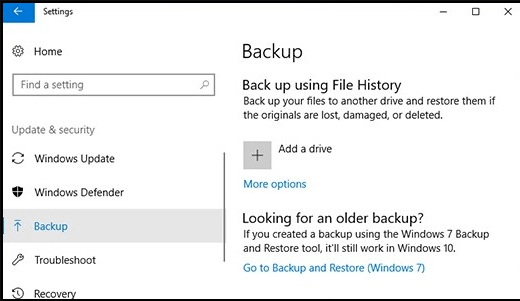
Step 4: Use File History
- Under the Backup section, look for the “Back up using File History” option.
- Click on “Add a drive” to select an external drive or a network location where you want to store your backup. It’s recommended to use an external hard drive or USB drive for this purpose.
Step 5: Configure File History Settings
Once you’ve added a drive, you can configure File History settings:
- Click on “More options” to access advanced settings.
- Here, you can choose how often you want your files to be backed up (e.g., every hour, daily, etc.).
- You can also select how long you want to keep the backed-up versions of your files. You can choose to keep them until space is needed, or specify a time frame.
Step 6: Select Folders to Back Up
In the same More options section, you can customize which folders to back up:
- By default, Windows backs up your Desktop, Documents, and Pictures folders.
- To add or remove folders, scroll down to the “Back up these folders” section and click on “Add a folder” or click on the minus (-) icon next to a folder to remove it.
Step 7: Manually Back Up Your Files
If you want to perform a manual backup immediately:
- In the Backup options, click on “Back up now”. This will start the backup process and save copies of your selected files to the designated drive.
Step 8: Restore Your Files
If you ever need to restore your files:
- Go back to the Backup settings and click on “More options.”
- Scroll down and click on “Restore files from a current backup.”
- You can browse through the backed-up files and select the items you want to restore.
Get your Windows 10 Home Key at an unbeatable price today and enjoy a seamless computing experience!