
Windows Blog
How do I Manage User Accounts in Windows 10 Home?

Managing user accounts in Windows 10 Home is essential for maintaining a secure, personalized, and organized experience on your PC. Whether you share your computer with others or need to set up different profiles for family members, Windows 10 Home offers easy-to-use tools for managing user accounts. Here’s a step-by-step guide on how to manage user accounts in Windows 10 Home.
1. Accessing the User Accounts Settings
To manage user accounts, you first need to access the user settings:
- Click the Start Menu and select Settings (the gear icon).
- In the Settings window, click on Accounts to open the user account management panel.
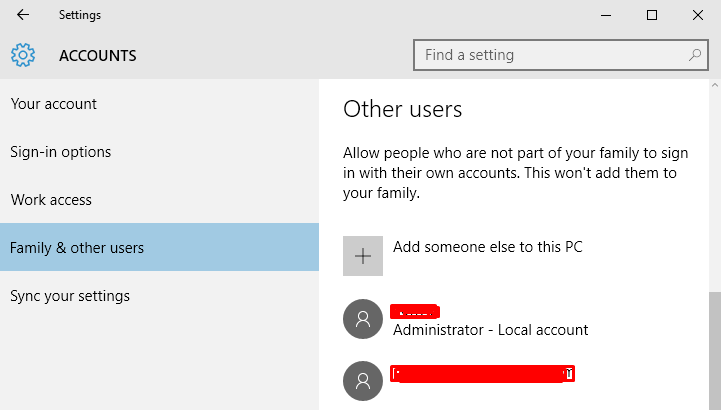
2. Creating a New User Account
If you want to add a new user to your computer, Windows 10 Home allows you to create both local accounts and Microsoft accounts:
- In the Accounts panel, select Family & other users from the left-hand menu.
- Under the Other users section, click Add someone else to this PC.
- You’ll be prompted to enter the new user’s email or phone number to create a Microsoft account. If you prefer a local account, click on I don’t have this person’s sign-in information and then choose Add a user without a Microsoft account.
- Follow the prompts to create the new user account with a username and password.
3. Managing Account Types (Standard vs. Administrator)
Windows 10 Home has two primary types of accounts: Standard and Administrator. Each has different permissions:
- Administrator accounts have full control over the system, allowing them to install software, change settings, and manage other accounts.
- Standard accounts are more restricted and are ideal for users who do not need access to system settings.
To change a user’s account type:
- Go to Settings > Accounts > Family & other users.
- Select the user account you want to manage, and click Change account type.
- Choose either Standard User or Administrator from the dropdown menu and click OK.
4. Removing a User Account
If you no longer need a user account, you can remove it from the system. Here’s how:
- In Settings > Accounts > Family & other users, find the account you want to delete.
- Select the account and click on Remove.
- Confirm the action. If the account is a local one, you will be given the option to delete the user’s files along with the account.
5. Setting Up Family Safety Features
Windows 10 Home allows you to manage user accounts for family members, including setting restrictions for child accounts. This feature helps you monitor your child’s activities, set screen time limits, and block inappropriate content:
- In Settings > Accounts > Family & other users, under Your family, click Add a family member.
- Follow the steps to add a child or another family member to your Microsoft Family.
- Once added, you can manage the account using Family Safety tools by visiting the Microsoft Family Safety website to adjust settings like screen time, app restrictions, and content filters.
6. Changing User Account Information
You can easily update the name, password, or profile picture of an account:
- To change the user’s name or password, go to Settings > Accounts > Your info.
- To change the account picture, click Browse for one under the Create your picture section and select an image.
7. Switching Between User Accounts
Once multiple user accounts are set up on your Windows 10 Home PC, switching between them is quick and easy:
- Click the Start Menu.
- Select the User icon (the name of the current user).
- Choose the user account you want to switch to.
The new user can log in using their password or PIN.
8. Managing User Permissions and Parental Controls
For added security, you can manage user permissions and enable parental controls. For child accounts, use Microsoft Family Safety to enforce activity restrictions. Additionally, standard user accounts can be given or revoked permissions based on their access needs.
Get your Windows 10 Home Key at an unbeatable price today and enjoy a seamless computing experience!